Frequently Asked Question
Setting Email Signature in Microsoft Outlook 2016
Last Updated 7 years ago
Purpose:
This documentation will outline the steps required to set or change an email signature in Microsoft Outlook 2016.
Steps Required:
Open a new mail windows (top left corner of the default Outlook page, New Email). On the new mail window that displays select Signature from the row of available buttons near the top of the window.

The Signatures and Stationery window will appear, seen below:

Within this window select New (highlighted above) to begin creating your new Email signature.

Choose a name for your signature, you can create multiple signatures within Outlook and switch between them for various use (example: you want your full signature to display for new emails but a truncated / smaller signature to display for replies and forwards, this can be done by creating two separate signatures and assigning them individually).
After clicking OK, the window that appears will allow you to fill out your signature as you see fit. Common information to include will be:

After you have finished filling in your signature select Save.
In the top right of this screen you will also see drop down menus for how the signature will be used. The first drop down will allow you to select different email accounts (this will likely be unchanged). Below that you will see the options for how the signature will be used (on new messages only, on replies/forwards only, or both). Select the name of your signature in the drop downs you would like it to apply to.
Last, click OK, and your new Outlook signature will be ready to use for all email you have chosen to use it for.
This documentation will outline the steps required to set or change an email signature in Microsoft Outlook 2016.
Steps Required:
Open a new mail windows (top left corner of the default Outlook page, New Email). On the new mail window that displays select Signature from the row of available buttons near the top of the window.
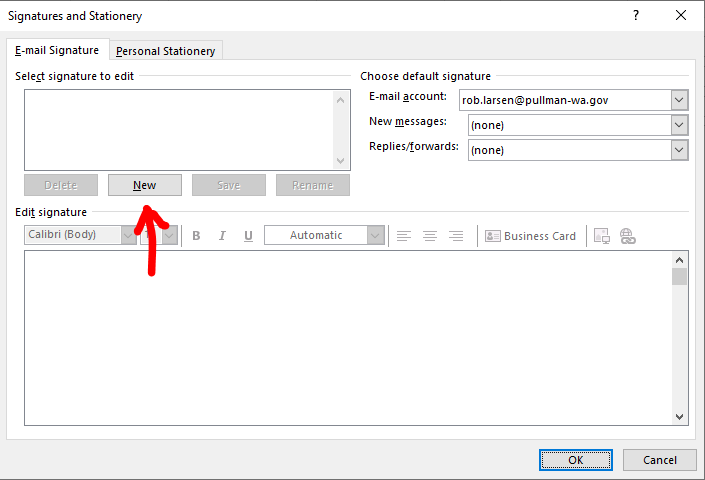
The Signatures and Stationery window will appear, seen below:
Within this window select New (highlighted above) to begin creating your new Email signature.
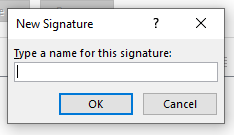
Choose a name for your signature, you can create multiple signatures within Outlook and switch between them for various use (example: you want your full signature to display for new emails but a truncated / smaller signature to display for replies and forwards, this can be done by creating two separate signatures and assigning them individually).
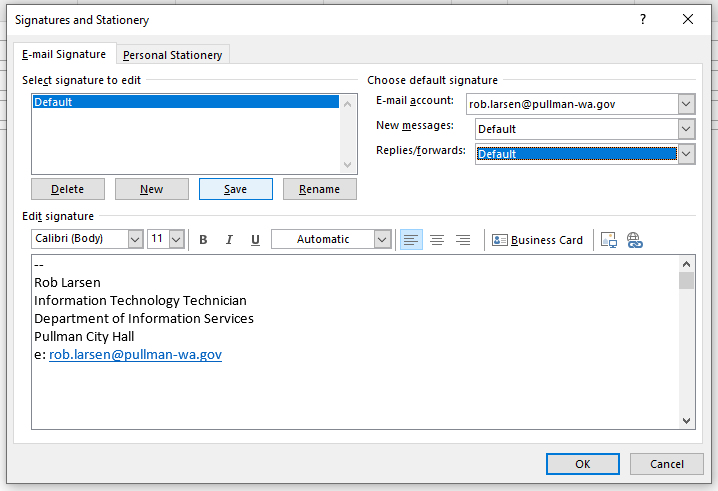
After clicking OK, the window that appears will allow you to fill out your signature as you see fit. Common information to include will be:
- Your name
- Your title
- Your location
- Preferred contact information (phone number and email address)
After you have finished filling in your signature select Save.
In the top right of this screen you will also see drop down menus for how the signature will be used. The first drop down will allow you to select different email accounts (this will likely be unchanged). Below that you will see the options for how the signature will be used (on new messages only, on replies/forwards only, or both). Select the name of your signature in the drop downs you would like it to apply to.
Last, click OK, and your new Outlook signature will be ready to use for all email you have chosen to use it for.